Step-by-Step Guide to Building a Sensory Room for Autism on a Budget

You may think creating a sensory room on a budget is challenging, but you can achieve it with some creativity. A sensory-friendly space helps individuals with autism feel calm and secure. Sensory Rooms provide essential support and assist people in acclimating to various sounds, lights, and textures. By designing a sensory room, you contribute to reducing anxiety, enhancing focus, and managing emotions.
Many people recognize that a sensory room offers a respite from overwhelming noise or light, allowing students to prepare for learning once again. Even minor adjustments can help you establish a sensory room that adheres to guidelines. You don’t need to invest in expensive items to create a sensory-friendly space—just a few clever ideas can significantly benefit individuals with autism. The principles for sensory rooms demonstrate that anyone can create one without incurring high costs.
Key Takeaways
Find out what sensory needs each person has first. Make the room fit their likes for light, sound, and texture.
Pick a quiet and safe spot for the sensory room. Small places work well, so check corners or cozy spaces.
Plan your spending by looking at thrift stores and using old things. You can make a sensory room for less than $300 if you shop smart.
Add different sensory things like soft lights, gentle sounds, and touchable materials. These things help make the room calm and relaxing.
Watch how people use the sensory room and change it if needed. Keep the room new and ready for different needs.
Assess Needs
Sensory Preferences
Think about what the person likes before you build a sensory space. People with autism have different sensory needs. Some enjoy soft lights. Others prefer bright colors. Some textures feel nice, but others can be too much. The sensory space should fit these needs.
Most people with autism have sensory differences.
Sensory input can feel too strong or too weak.
Sensory spaces help control how much input you get.
How someone reacts to input can change with autism’s severity.
Sensory spaces for kids may look different than for teens or adults.
Age does not always change how hard sensory challenges are. It can change what types of input work best.
Picking the right sensory input can lower tough behaviors and help learning.
Ask questions like, “Do you like soft or rough things?” or “Does bright light bother you?” This helps you pick the best items for your sensory space. You want the room to feel safe and cozy.
Triggers and Calming Tools
Sensory spaces work best when you know what causes stress and what helps calm down. Loud noises or strong smells can upset some people. Too many colors or patterns can be overwhelming. Make a list of things that cause stress in sensory spaces.
Tip: Keep a notebook nearby. Write down what makes you or your child feel calm or upset in different sensory spaces.
When you know the triggers, you can add calming tools to the space. These can be soft pillows, weighted blankets, or headphones that block noise. You can use gentle lights or quiet music. Always have a spot for quiet time in the sensory space. This helps neurodivergent people feel safe and in control.
Sensory spaces are not just for kids. Adults with autism also need spaces that fit their needs. When you pay attention to sensory input and triggers, you make sensory spaces that really help.
Choose a Space
Quiet Areas
You want your sensory room to feel peaceful. Start by looking for a spot in your home that stays quiet most of the time. Bedrooms, corners of living rooms, or even a large closet can work. You don’t need a whole room. Sometimes, a small tent or a cozy nook does the trick. The main goal is to pick a place where you or your child can relax without loud noises or distractions.
Here’s a quick look at what matters when you choose a space:
Factor | Description |
|---|---|
Individual Needs | Tailor the sensory room to fit the user. Try different setups to see what works best. |
Available Space | You don’t need a big area. Small spaces like tents or corners can be just as helpful. |
Type of Sensory Room | Decide if you want a calming space, a stimulating space, or both. This helps you pick the right tools. |
Think about colors and lighting, too. Neutral tones and mellow shades help keep things calm. Bright colors might feel too strong and make it hard to relax. Soft lighting works better than harsh overhead lights. You can use lamps or string lights for a gentle glow.
Tip: If you can, choose a spot away from busy hallways or noisy appliances. This helps keep the sensory room peaceful.
Safety and Access
Safety comes first. You want the sensory room to be easy to reach but also safe for everyone. Keep the floor clear so no one trips. Use soft mats or carpets to cushion falls. Store sensory toys and weighted blankets in organized bins. This keeps clutter away and makes it easy to find what you need.
Here are some safety steps to follow:
Add sensory tools like weighted blankets and soft toys.
Use adjustable lighting to match visual needs.
Organize storage to cut down on distractions.
Set up zones for different activities, like reading or relaxing.
Pick calming colors for walls and furniture.
Involve your child in the design. Ask what feels safe and comfortable.
You should always supervise young children in the sensory room. If someone is at risk of falling, stay close. Keep all equipment in the room so nothing gets lost or misused. If you have helpers, make sure they know how to use everything safely.
Note: A safe, quiet space helps everyone feel more comfortable and confident. You can make a big difference with just a few thoughtful choices.
Set a Budget
Cost Planning
You want to create a sensory room without spending too much. Start by looking at budget options for every part of the space. Write down what you need and check prices online or at local stores. Many families find that budget options help them save money while still getting good results.
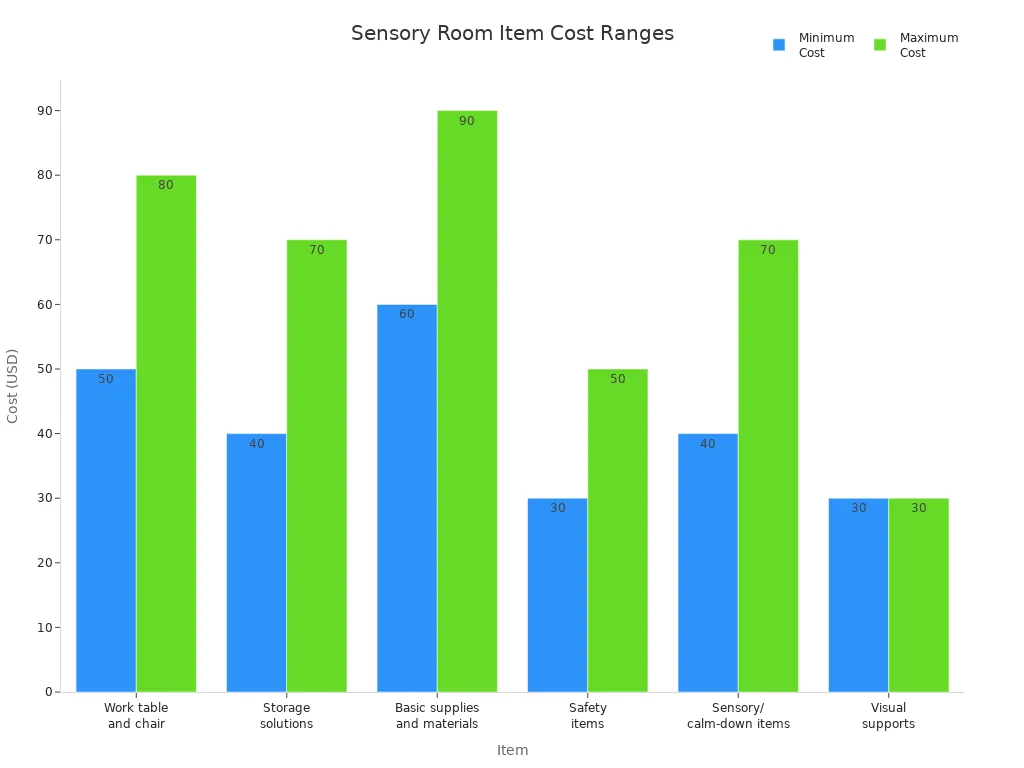
Take a look at this table. It shows the average cost range for building a sensory room for autism at home:
Item | Cost Range |
|---|---|
Work table and chair | $50-80 |
Storage solutions | $40-70 |
Basic supplies and materials | $60-90 |
Safety items | $30-50 |
Sensory/calm-down items | $40-70 |
Visual supports | $30-30 |
Total | $250-290 |
You can see that budget options make it possible to design a sensory room for less than $300. If you look for sales or secondhand items, you might spend even less. Many neurodivergent users need different tools, so plan for a mix of items. You can always add more later.
Priorities
When you design a sensory room, you need to set your priorities. Think about what matters most for autism support. Do you need soft lighting, quiet corners, or special textures? Make a list of must-haves and nice-to-haves. Budget options let you focus on the most important things first.
Here are some tips for setting priorities:
Choose items that help calm and comfort.
Pick budget options for storage and seating.
Add sensory tools that match your needs.
Leave room for changes as you learn what works.
Tip: Start small. You can always add more budget options as you go. The best sensory room grows with you and your family.
If you keep your priorities clear, you will create a sensory room that feels safe and welcoming for neurodivergent users. You do not need fancy equipment. Simple budget options can make a big difference.
Sensory Elements

Creating the right sensory elements can turn any area into a supportive place for sensory spaces. You do not need fancy sensory room equipment to make a big impact. Let’s look at how you can use lighting, textures, sound, seating, and visuals to build sensory spaces that help everyone feel calm and focused.
Lighting Options
Lighting shapes how sensory spaces feel. Some people need soft, gentle light. Others enjoy moving colors or glowing effects. You can mix and match lighting to fit your needs. Here’s a quick guide to popular lighting choices for sensory spaces:
Type of Light | Description | Benefits |
|---|---|---|
LED Projectors | Cast moving images or colors onto surfaces | Engages visually and can ease stress or anxiety |
Color-Changing Lamps | Adjustable colors for different moods | Lets you change the space to match your feelings |
Bubble Tube Lamps | Colored bubbles and lights | Captivates and helps with focus and calm |
Light Panels | Interactive play or soft glow | Offers tactile fun and a peaceful environment |
You can find affordable options for most of these lights. String lights or small lamps also work well in sensory spaces. Try to avoid harsh overhead lights. Soft lighting helps you relax and enjoy sensory experiences. If you want to add a calming effect, place a bubble tube lamp in the corner. This can become a favorite spot in your sensory room.
Tip: Use dimmers or remote controls to adjust the brightness. This gives you more control over your sensory spaces.
Textures and Tactile
Touch is a big part of sensory experiences. Many people with autism love to explore different textures. You can fill sensory spaces with items that invite touch and help with focus. Here are some great tactile materials for your sensory room:
Weighted blankets give deep pressure and help you feel calm.
Tactile mats have many textures. You can walk, sit, or run your hands over them.
Vibrating massagers offer gentle vibrations for relaxation.
Bubble wrap, Velcro strips, and textured fabric are easy to find and fun to touch.
Soft pillows and plush toys add comfort and variety.
You can also create a sensory wall with different materials. Glue pieces of fabric, foam, or even sandpaper to a board. This lets you explore textures in one spot. Sensory spaces with tactile choices help you manage stress and enjoy new sensory experiences.
Try making a “snuggle space” with a play tent or blow-up mattress. Add weighted blankets and soft cushions for deep pressure. This cozy area can help you feel safe and secure.
Sound and Noise Control
Sound can make or break sensory spaces. Some people need quiet. Others like gentle background noise. You can control sound in your sensory room with a few simple steps:
Seal door gaps with sweeps or weather stripping to block outside noise.
Attach acoustic panels to the walls. These absorb sound and cut down on echo.
Use carpets, rugs, or rubber mats on the floor to dampen noise.
If you want calming sounds, try a white noise machine or soft music. Headphones that block noise can also help. Sensory spaces with good sound control feel peaceful and safe. You can focus better and avoid feeling overwhelmed.
Note: Keep noisy toys or electronics in a separate area. This keeps your sensory room calm and welcoming.
Seating and Comfort
Comfortable seating is a must for sensory spaces. You want a spot where you can relax, read, or just take a break. Here are some seating ideas that work well in sensory spaces:
Bean bags and floor cushions let you sink in and feel secure.
Weighted blankets and vests give deep pressure and help calm your body.
Tactile pillows add softness and support.
A blow-up mattress or soft mat can create a cozy “snuggle space.”
You can set up a reading corner with a bean bag and a weighted blanket. This gives you a place to unwind after a busy day. Sensory spaces with comfy seating help neurodivergent users feel at home.
Try moving seating around until you find the best spot. Everyone has different needs, so test what feels best for you.
Visual Stimuli
Visuals play a big role in sensory spaces. Some people love bright colors and moving lights. Others need soft, simple visuals to stay calm. You can add visual interest to your sensory room in many ways:
Motion and color-changing toys keep your eyes engaged.
Interactive toys with textures, sounds, and lights offer a full sensory experience.
Mirrors can make the space feel bigger and reflect light.
Clear bottles with glitter or water beads are easy DIY visual tools.
Keep your sensory spaces organized. Too many visuals can feel overwhelming. Use shelves or bins to store toys and tools. Try to keep the space tidy so you can focus on the sensory experiences you enjoy most.
Tip: Use visual schedules or picture cards to add structure. This helps you know what to expect and makes sensory spaces feel predictable.
Sensory spaces do not need to be expensive or complicated. With a few simple changes, you can create a sensory room that supports relaxation, focus, and joy. Try different sensory room equipment and see what works best for you. Every sensory space is unique, just like the people who use them.
DIY and Affordable Materials
Building a sensory room doesn’t mean you have to spend a lot. You can create a calming space with things you already have at home or find at local stores. Let’s look at some smart ways to save money and still get a sensory room that works for you.
Repurpose Items
You probably have plenty of items around your house that can become sensory tools. You don’t need to buy everything new. Look for things you can reuse or give a new purpose.
Old furniture can become a cozy reading nook with soft blankets and pillows.
Fabric scraps and buttons make great DIY sensory boards. Glue them to a sturdy board for a fun tactile wall.
Empty water bottles can turn into sensory bottles. Fill them with water, glitter, and food coloring for a calming visual tool.
Bubble wrap, Velcro strips, and sponges add texture to walls or bins.
Storage bins help keep sensory toys organized and easy to reach.
Tip: Walk through your home and look for items you don’t use anymore. You might find something perfect for your sensory room.
Thrift and Discount Finds
Thrift stores and discount shops are treasure troves for sensory room supplies. You can find affordable lighting, decor, and toys that fit your needs. Many families build sensory spaces for less by shopping secondhand.
Here are some places to check for deals:
Source | What You Might Find |
|---|---|
Thrift Stores | Lamps, soft chairs, textured rugs, toys |
Discount Stores | Pillows, bins, art supplies, string lights |
Online Marketplaces | Used sensory equipment, bundles, kits |
Bulk Suppliers | Packs of sensory materials at lower prices |
You can also look for sensory room packages or classroom kits online. These bundles often include essentials like bubble tubes, fiber optic tails, and tactile toys. Some websites offer bulk pricing, which helps you save even more.
Note: Always check the condition of secondhand items. Make sure they’re safe and clean before adding them to your sensory room.
Simple DIY Projects
You can make many sensory tools yourself with easy projects. These diy sensory room ideas help you create a personalized space without spending much.
Make sensory bottles with clear water bottles, water, glitter, and food coloring.
Fill small containers with beans or rice to create shakers or sensory bins.
Glue sandpaper, fabric scraps, and sponges to a board for a tactile wall.
Try finger painting for a hands-on sensory experience.
Use playdough for activities that strengthen hand muscles.
Dye rice with food coloring for colorful sensory bins.
You can involve your child in these projects. Let them pick colors or textures they like. This makes the sensory room feel special and tailored to their needs.
Tip: Keep a box of craft supplies handy. You can add new sensory tools whenever you want to change things up.
Creating a sensory room on a budget is possible. Many families and schools build sensory spaces for $200 to $500, while professional installations can cost much more. You don’t need commercial-grade materials to make a space that feels safe and calming. With a little creativity, you can design a sensory room that fits your needs and your budget.
Arrange the Room
Activity Zones
It is good to keep your sensory room neat and friendly. Making different areas in the room helps with this. Each area can meet a different sensory need. You could have a quiet spot for reading. Another area might be for touching different things. You can also set up a place with calming lights. Dividing the room makes it easier to switch between activities. It also gives clear choices for what to do.
Here is an easy way to set up your areas: First, choose a quiet place in your house. Even a small corner is fine. Next, think about what you or your child enjoys. Some people like calm spaces. Others want more action. Always check that everything is safe. Heavy things should not fall. Stay away from sharp corners. Start with just a few items. You can add more later. Ask the person using the room for their ideas. Their thoughts are important.
When you have clear areas, it stops people from feeling too overwhelmed. It also helps everyone know what will happen next. This makes the room feel safe and steady.
Strategy Type | Description |
|---|---|
Helps stop too much input, makes changes easier, and helps kids know what will happen. | |
Lighting management | Uses sunlight and lights you can change for a calm feeling. |
Sound management | Adds soft panels and rugs to make things quieter. |
Color selection | Soft colors with some bright ones keep the room from being too much. |
Movement Space
Moving around is important in a sensory room. You need a spot to stretch, jump, or sway. Try to leave some open space for yoga, dancing, or a sensory swing. If your room is small, use a mat or a soft corner.
Tip: Keep the moving area free of furniture. This keeps you safe and lets you move easily.
Lights and sounds matter here too. Use lights you can change and soft rugs to make it feel safe. Soft panels help keep the noise down so it does not get too loud.
Clutter-Free Setup
A room without clutter feels calm and simple to use. You should keep sensory tools organized so you can find them fast. Use clear boxes and labels to sort toys and supplies. Drawers with colors make it even easier. Picture cards show kids where things belong. This helps them learn to clean up.
Clear signs help you keep track of sensory items.
Less clutter keeps sensitive kids from feeling stressed.
Labeled bins and drawers make cleaning up easy.
Cleaning up often helps keep a steady routine.
Note: Keeping the room tidy makes it easier to move around and less likely to cause too much sensory input. A neat space helps everyone feel safe and in charge.
Test and Adjust
Observe and Get Feedback
Once you finish setting up your sensory room, take some time to see how it works. Watch how your child or family member uses the space. Notice what they enjoy and what they avoid. You might see them spend more time in the snuggle corner or play with certain textures. Ask simple questions like, “Do you like this light?” or “Does this spot feel good?” Their answers help you know if your calming space for kids is working.
You can also try these feedback ideas:
Invite your child to help pick out new items for the room.
Let them show you their favorite part of the calming space for kids.
Write down what works well and what needs to change.
Tip: Involve everyone who uses the room. Their ideas matter and can make the space even better.
Ongoing Improvements
A sensory room is never truly finished. Needs change over time, so you should check the room often. Move things around if something does not feel right. Add new textures or lights when you find something helpful. Remove items that cause stress or go unused.
Here are some ways to keep your sensory room fresh:
Swap out toys or tools every few months.
Try new lighting or sound options.
Ask for feedback after each change.
You can use a simple table to track changes:
Date | Change Made | Result |
|---|---|---|
3/1/2024 | Added bean bag | More relaxation |
4/10/2024 | Swapped lighting | Less eye strain |
Keep your focus on comfort and safety. When you listen and adjust, your sensory room will always be a welcoming place.
Sensory Room on a Budget
Creating a sensory room on a budget can feel overwhelming, but you have plenty of ways to save money and still build a space that works. You don’t need fancy equipment or expensive gadgets. With a little creativity, you can turn any area into one of the best sensory spaces for autism.
Money-Saving Tips
You can stretch your dollars by thinking outside the box. Here are some smart ways to keep your sensory room on a budget:
Make your own sensory boards with fabric scraps, buttons, or textured paper you already have at home.
Repurpose old furniture by adding soft blankets or cushions to make it sensory-friendly.
Shop at thrift stores for affordable lighting, decor, and toys. You might find string lights, bean bags, or textured rugs for a fraction of the price.
Use empty water bottles to create calming sensory bottles with glitter and water.
Ask friends or family if they have items you can use in your sensory spaces.
Tip: The best sensory spaces often come from simple ideas and things you already own.
Mistakes to Avoid
When you set up sensory spaces, you want to make sure you don’t fall into common traps. Here are some mistakes you should watch out for:
Overstimulating the space. Flashing lights and loud music can overwhelm neurodivergent users.
Designing for looks instead of needs. Focus on what helps you or your child feel calm and safe.
Ignoring sound. Make sure your sensory room on a budget includes soft rugs or panels to keep things quiet.
Skipping clear zones. Divide your sensory spaces into areas for different activities, like relaxing or moving.
Not asking for input. Talk to the person using the sensory room. Their ideas matter most.
You can avoid these mistakes by listening to your needs and making changes as you go. Remember, the best sensory spaces support comfort and calm for everyone, especially those with autism.
Note: Prioritize what matters most. Use your creativity to get the most value from your sensory room on a budget.
Sensory Rooms for Adults
Adult Needs
Some people think sensory rooms are just for kids. Adults need them too. Many adults with autism have sensory problems every day. Bright lights, loud sounds, or strong smells can make you feel stressed. You might get tired or upset from these things. Sensory rooms for adults give you a safe place to rest. You can relax and feel better there.
Adults need spaces for work, hobbies, or quiet time. You may want a spot to read or listen to music. Some adults like soft lights and gentle textures. Others enjoy using fidget toys or touching special walls. Sensory rooms for adults help you focus and feel less anxious. They can also help you feel happier.
Researchers found sensory rooms help adults in real ways. Here are some things they learned:
Multisensory rooms lower repetitive actions and help adults pay attention.
Therapy in sensory rooms helps adults respond better to touch, taste, and smell.
Tip: Think about what makes you feel calm or full of energy. Use those ideas when you set up your sensory room.
Adaptations
You can change sensory rooms for adults to fit your life. Pick furniture that feels good and supports you. Bean bags, soft chairs, or weighted blankets are great choices. Use lights you can adjust to change the mood. Try headphones that block noise or play soft music.
A table can help you plan your sensory room for adults:
Adaptation | Benefit |
|---|---|
Adjustable lights | Change brightness and color |
Soft seating | Stay comfy for a long time |
Tactile objects | Lower stress and help you fidget |
Visual tools | Help you focus and relax |
You might want a workspace for hobbies or jobs. Shelves and bins keep things neat. If you share your room, talk with others about what feels good. Sensory rooms for adults should help you feel independent and comfortable.
Remember, your sensory room can change as your needs do. Try new things and see what works best for you.
You can make a sensory room by following easy steps and using creative ideas. Try making glitter jars or touch boards at home. Look for cheap equipment at second-hand stores. Let your child help plan the room. Change the lights or sounds to make the space calm. Use checklists or simple reviews to see how things get better. Begin with small changes and celebrate each one. Every effort you make helps your family feel safe and included.
FAQ
What is the best way to start building a sensory room?
You can begin by picking a quiet spot in your home. Make a list of your needs. Use items you already have. Add soft lighting and cozy seating. Try simple changes first.
How much does a sensory room usually cost?
Most budget sensory rooms cost between $200 and $500. You can save money by using thrift stores, repurposing household items, and making DIY sensory tools.
Can I make a sensory room in a small space?
Yes! You can use a corner, closet, or tent. Add soft mats, pillows, and gentle lights. Keep the area tidy. Small spaces work well for calming and focus.
What sensory items help most with calming?
Weighted blankets, soft pillows, gentle lights, and noise-canceling headphones help many people relax. You can also use sensory bottles or tactile mats for extra comfort.
See Also
Creating A Home Sensory Room For Children With ASD
Affordable DIY Ideas For Crafting A Sensory Room
Constructing A Sensory Gym For Kids With Autism