Light Up Sensory Table DIY for Early Childhood Learning
Yes, you can easily make a light up sensory table right at home. You give kids a place to explore light, color, and texture. Sensory play sparks creativity and helps children learn new skills every day. You do not need fancy tools or a big budget. This project fits perfectly for beginners and families who love hands-on activities. Get ready to see big smiles and bright ideas!
Key Takeaways
Making a light up sensory table is easy and cheap. You need simple things like a clear bin, LED lights, and acrylic sheets. These help you make a cool place to learn.
Playing with a light table helps kids be creative. It also helps them get better at talking and working with others. Kids learn to share and talk while they play and explore.
You can use the sensory table for many learning activities. Kids can do STEM by sorting, counting, and trying out light and color.
Safety matters when you build your sensory table. Use safe materials that are not toxic. Make sure the edges are smooth and the table is strong. This keeps kids safe while they play.
Change the materials and themes on the sensory table often. This makes activities new and fun. It helps kids keep exploring and learning.
Benefits of a Light Up Sensory Table
Sensory Play and Development
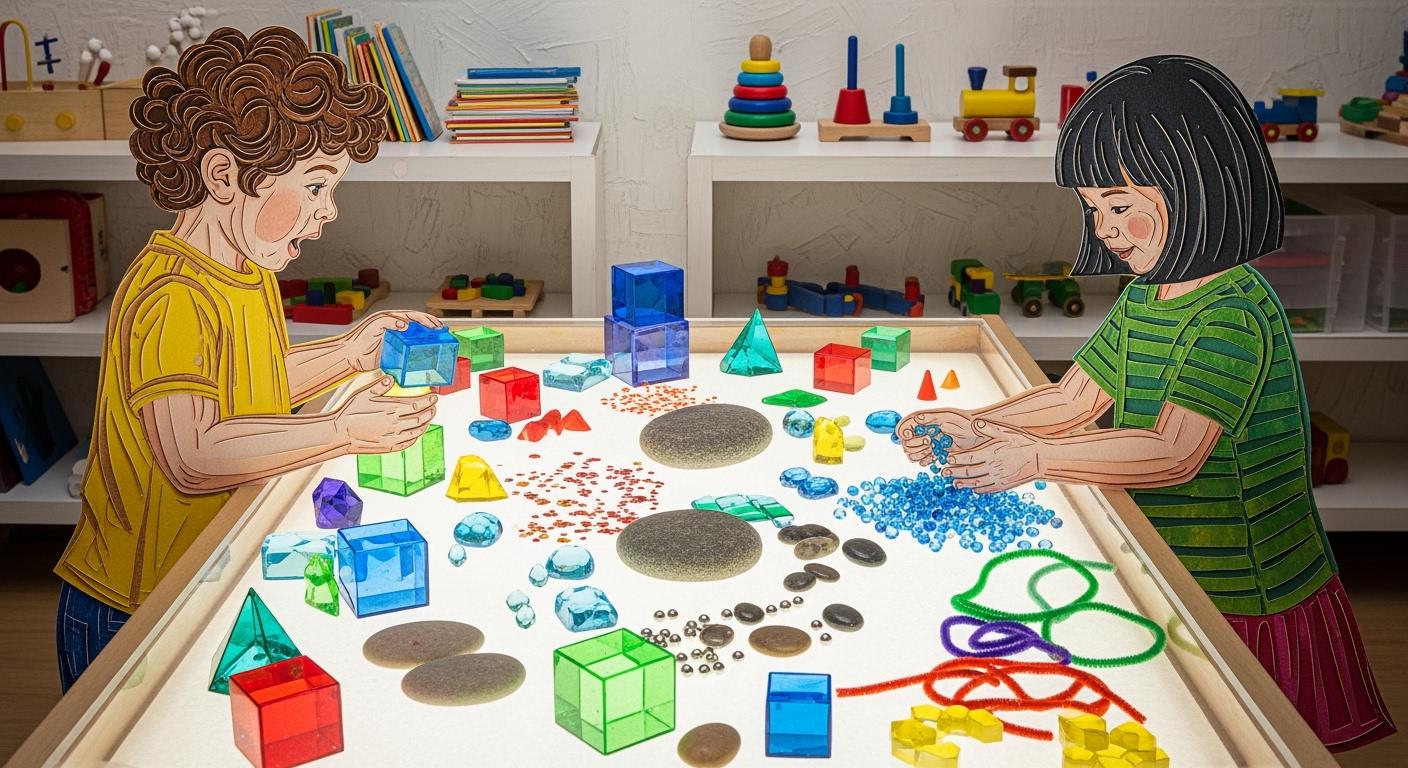
You want your child to have fun and learn. A light up sensory table helps with both. Kids touch and move things on the glowing table. Their brains become active when they do this. Sensory play helps kids pay attention and remember things. It also helps them handle their feelings. You will see them share, talk, and work with others. They learn social skills this way.
Studies show sensory tables help with fine and gross motor skills. Picking up small things or pouring water helps kids get ready to write. These actions help with daily life skills. Walking around the table builds balance and body control. Sensory play also teaches patience and kindness. Kids learn to share space and materials.
A montessori light table is a special place for hands-on learning. Kids try new things, compare, and sort objects. This play helps them focus and solve problems. Science says these early activities shape the brain. It helps kids learn language and control their actions later.
Tip: Ask your child to feel different textures, colors, and shapes. See how their curiosity grows!
Creative and Educational Uses
A sensory table can be like a small classroom. Kids love to build, sort, and make things on the glowing table. The light up table makes every activity feel special.
Here are some ways to use it for learning:
STEM Area | Light-Table Activity | Foundational Concept |
|---|---|---|
Science | Layer colored film, study leaves, compare opaque vs transparent items | Properties of light & matter |
Engineering | Build towers from translucent bricks, create mirrored “light paths” | Balance, stability, reflection |
Mathematics | Sort, count or pattern colored counters; explore symmetry with pattern blocks | Classification, sequencing, geometry |
You can use the table for math, science, reading, and even social studies. Kids make up stories, build things, and try new ideas. The small space helps them work together and talk. Every project glows, making kids feel proud and happy.
Montessori teachers like these tables for open-ended play. You give your child tools to discover new things. You watch their imagination grow. Sensory play on a light table helps kids focus, be creative, and love learning.
DIY Light Table Materials and Tools
Choosing the Right Table or Bin
You have lots of choices for your diy light table base. Some people use a sturdy wooden table. Others pick a large, clear storage bin. Both work well. If you want a table that lasts, look for one with a wide base and no sharp corners. This keeps the table steady and safe for kids. You can even add guardrails on three sides for extra safety.
Here’s a quick look at what matters most:
Factor | Considerations |
|---|---|
Structural Safety | Solid frame, wide base, no wobbling, no sharp corners or exposed screws |
Baby Safety | Guardrails, safety straps, snug-fitting pad |
Material Safety | Non-toxic paints, smooth edges, meets safety standards |
Tip: Measure your space before you start. Make sure the diy light table fits and is easy to move.
Acrylic Sheet and Lighting Options
The top of your table needs to glow and spread light evenly. Translucent plexiglass works great. It’s strong and lets light shine through without hot spots. For the best effect, try a Perspex® LED light diffusing opal acrylic sheet. This type spreads the light so everything on the table looks bright and clear.
For lighting, LED strip lights are a smart pick. They use little energy, last a long time, and stay cool to the touch. Some LED kits even come with remote controls and color-changing modes. Kids love picking their favorite colors! You can also find rechargeable LED lights that run for hours and don’t need to be plugged in all the time.
Additional Supplies
You don’t need fancy tools. Here’s a simple list to get you started:
Clear storage bin or small table (repurposed works too)
Translucent plexiglass or acrylic sheet
LED strip lights or puck lights (battery-powered or rechargeable)
Tape or mounting clips for lights
Sandpaper for smoothing edges
Non-toxic paint (optional)
Small screws or strong glue
If you want to save money, check out affordable sand and water bins. Many cost less than $20 and work well for sensory play. You can always upgrade later as your child grows.
How to Build a DIY Sensory Table
Ready to start building a montessori light table? You can use a wooden frame or a storage bin. Both methods work well for a light up sensory table. You just need to follow clear instructions and use safe materials. Let’s break down each step so you can build your own diy sensory table with confidence.
Frame or Bin Preparation
You need to decide which base fits your space and style. If you want a sturdy table, go with wood. If you prefer something lightweight and easy to move, try a storage bin.
Wooden Frame Method:
Choose the size for your light up sensory table. Most people pick around 24"x36".
Build a rectangular frame using screws and wood glue. Make sure the corners are tight.
Attach legs to each corner. Adjust the height so your child can reach the table comfortably.
Sand all edges. Smooth out rough spots to keep little hands safe.
Storage Bin Method:
Cut pipes for the frame: 6 pieces at 12.5”, 6 at 9.75”, and 4 at 18”.
Assemble the frame. Squeeze the joints tightly so everything stays secure.
Spray paint the frame if you want a fun color. Let it dry completely.
Place the bin into the slots. Check that it fits snugly and doesn’t wobble.
Tip: Always check for sharp edges or loose parts before you move to the next step. Safety comes first!
Installing the Light Source
You want your light up sensory table to glow evenly. Pick a lighting method that fits your needs and budget. Here’s a quick guide:
Lighting Method | Description |
|---|---|
Easy to install, stick-on designs, no drilling needed. | |
LED Strip Lights | Flexible, stick to surfaces, give soft ambient light. |
Motion Sensor Lights | Turn on with movement, great for bins without wiring. |
Wireless Plug-in Lights | Plug into outlets, often come with remote controls. |
Smart Lighting Solutions | Control with your phone or voice, modern and simple to use. |
For wooden frames, attach LED strip lights inside the frame in a zig-zag pattern. This spreads the light and keeps it bright. If you use a storage bin, stick battery-powered puck lights or LED strips to the bottom. Make sure the lights stay cool and don’t touch water or sand.
If you want to control brightness, add a dimmer switch. Kids love changing the colors and brightness. Always check that wires and batteries are secure and out of reach.
Note: Rechargeable lights are safer for young kids. You avoid cords and outlets near the sensory table.
Adding the Acrylic Top
The acrylic top makes your light up sensory table shine. You need to secure it so it doesn’t slide or pop off during play. Here are some options:
Type of Adhesive | Description | Applications |
|---|---|---|
Brush or pour on, strong bond for wood and trim. | Attaching acrylic to wood frames. | |
Paste Adhesives | Thick, use for sealing joints or heavy-duty bonding. | Securing large acrylic sheets. |
Adhesive Tape | Quick and clean, comes in rolls or strips. | Fixing acrylic to bins or frames. |
Place the frosted acrylic sheet on top of your frame or bin. Use adhesive tape for a fast setup. If you want a permanent bond, try liquid adhesives. Always let the glue dry before you let kids play. Check that the acrylic sits flat and doesn’t move.
Tip: Sand the edges of the acrylic sheet. This keeps the surface smooth and safe for little fingers.
Assembly and Finishing Touches
You’re almost done! Put all the parts together and check for stability. Make sure the table doesn’t wobble. If you built a wooden frame, secure the acrylic top with screws or glue. For bins, double-check that the bin fits tightly in the frame.
Add a non-toxic finish to wood if you want extra protection. Paint the frame for a fun look. Test the lights and make sure everything works. Clean the surface and remove dust.
Invite your child to try the diy sensory table. Watch their face light up as they explore colors and textures. You can use the table for montessori activities, science experiments, or creative play. The light up sensory table brings learning to life.
Callout: Keep your instructions handy. If you ever need to fix or upgrade your sensory table, you’ll know exactly what to do.
Montessori Light Table Safety Tips
Safe Materials and Construction
Safety is very important when you build a montessori light table. Pick paints and sealants that are non-toxic and water-based. These keep dangerous chemicals away from your table. Always pick corners that are smooth and rounded. Sharp edges can hurt kids with bumps or cuts. A light table should be easy for kids to move. This helps them feel brave and independent. Make sure your table is strong and does not tip over. Here’s a simple guide:
Safety Feature | Description |
|---|---|
Use non-toxic, water-based paints and sealants. | |
Rounded corners | Smooth all edges to prevent injuries. |
Lightweight design | Let children move the table safely and easily. |
Sturdy construction | Prevent tipping and keep the table stable during play. |
You can also use BPA-free plastic bins and powder-coated steel frames. These are safe and easy to wipe clean.
Electrical and Lighting Safety
You want your montessori light table to glow, but it must be safe. Always turn off the power before working with led lights. Use tools made for electrical jobs, like wire cutters and voltage testers. Wear safety glasses and gloves to protect your hands and eyes. Keep your work area neat so you do not trip or lose tools. Rechargeable or battery-powered led lights are best for sensory tables. These lights do not need cords or outlets, so kids stay safer.
Safety Guidelines | Description |
|---|---|
Prevent shocks by switching off electricity before starting. | |
Use appropriate tools | Only use tools designed for electrical work. |
Rechargeable/battery LED | Safer than plug-in lights for children’s spaces. |
Clean workspace | Reduces hazards and keeps things organized. |
Maintenance and Supervision
Keep your montessori light table safe by cleaning it often. Wipe the table and tools after every use. Pick objects that are right for your child’s age to stop choking. Show kids how to use the sensory table safely from the start. Change out materials to keep things fun and easy to clean. Check for loose parts or sharp edges every week. Use strong materials and non-toxic finishes to make cleaning easy and safe.
Tip: Always watch your child during playtime. Being there helps stop accidents and teaches safe habits.
Sensory Play Ideas for Light Tables

Light-Based Sensory Activities
Your montessori light table can become a place for fun and learning. Kids like to sort colors using see-through shapes. They stack blocks that let light shine through. Tracing letters on gel bags is also exciting. You can put leaves and flowers on the table to bring nature inside. Kids make patterns with colored tiles or touch water beads. Counting with clear counters helps numbers feel real. Try looking at x-rays or use shadow puppets to tell stories. You can make art for each season with see-through cut-outs. These activities help kids get curious and learn by playing.
Tip: Try mixing different materials together. Kids stay interested when you change the activities.
Educational Games
Learning can feel like play on a sensory table. Kids learn about cause and effect with led lights and objects. You can turn simple lessons into fun games. For example, use a salt tray to write letters or numbers. The glowing table gives a feeling you can touch, which helps memory. Here are some games you can try:
Activity | Learning Goal |
|---|---|
Salt Tray Writing | Tactile feedback helps with memory for early literacy and numeracy skills. |
Counting Games | Transparent counters make math fun and visual. |
Alphabet Tracing | Kids trace letters on gel bags for hands-on learning. |
You can change these games for different ages and skills. The led lights make every game more fun.
Seasonal and Thematic Play
You can use your sensory table to celebrate every season. In winter, kids make snowflakes with see-through cutouts. Spring is for making flowers from bright shapes. In autumn, they use pumpkins and leaves to make a cozy scene. The table below shows some ideas:
Seasonal Theme | Activity Description |
|---|---|
Winter | Create snowflakes using transparent cutouts. |
Spring | Design flowers with colorful transparent shapes. |
Autumn | Arrange pumpkins and fall leaves in a creative scene. |
Montessori teachers like how these themes help kids be creative and work together. You can guide kids but let them choose how to play. Each season brings new things to discover and enjoy.
Note: Change the themes often. Kids get excited for new activities and keep loving sensory play.
You can build a light up sensory table with simple steps and basic supplies. This project gives children a fun way to learn and explore every day. You can change the design to fit your space or style. Watch how children grow in creativity and confidence as they play.
Share your photos or ideas in the comments! Your story might inspire another family to start their own project.
FAQ
How old should children be to use a montessori light table?
You can introduce a montessori light table to children as young as 18 months. Always supervise younger kids. Older children enjoy more complex activities, so this table grows with your family.
Can I use regular glass instead of acrylic for the top?
No, you should not use regular glass. Acrylic is safer for children. It does not shatter and feels lighter. You want to keep playtime safe and worry-free.
What materials work best for sensory play on the table?
You can use transparent blocks, colored shapes, water beads, or natural items like leaves. Children love to explore different textures and colors. Try rotating materials to keep things fresh.
How do I clean and maintain the montessori light table?
Wipe the surface with a damp cloth after each use. Check for loose parts or sharp edges weekly. Keep the lights dry. Regular cleaning keeps the table safe for children and extends its life.
Can I build a montessori light table if I have no woodworking skills?
Yes! You can use a storage bin and LED lights for a simple version. Many parents find this method easy. You do not need special tools. Children will still enjoy hours of creative play.
See Also
Creative Sensory Table Concepts for Simple Home Arrangements
Affordable DIY Sensory Room Concepts for Every Budget
Essential Sensory Play Concepts for Early Childhood Teachers